Wednesday, January 21, 2015

How to remove DRM from protected Audiobooks and convert to MP3 / AAC

Audiobooks you purchased from iTunes Store are often protected by DRM protection that only allows you to listen to these audio books on your iPhone, iPad or iPod. If you want to play them on mp3 players such as PSP, Blackberry, Creative Zen and mobile phones, you have to remove DRM from audiobooks and convert the DRM protected audiobooks to MP3. Strongly recommend this Audiobook DRM Removal software – Macsome Audiobook Converter for Mac.
Macsome Audiobook Converter works sound recording technology to convert audiobooks from iTunes Store. So it keeps the users on the legal side. It can convert purchased audiobooks to MP3 or AAC to play anywhere. The conversion is 5X speed fast, and the output could be CD quality.
If you play the audiobooks on iTunes, Macsome Audiobook Converter can load the audiobooks automatically from the iTunes Books library on the list. You just select what you want to convert on the Audiobooks.
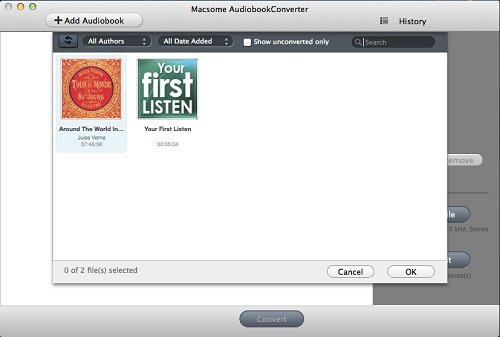
In addition, you can drag the DRM protected audiobooks to the list.
Before the conversion, you can click Profile button to customize MP3 as the output format from the drop-down list.
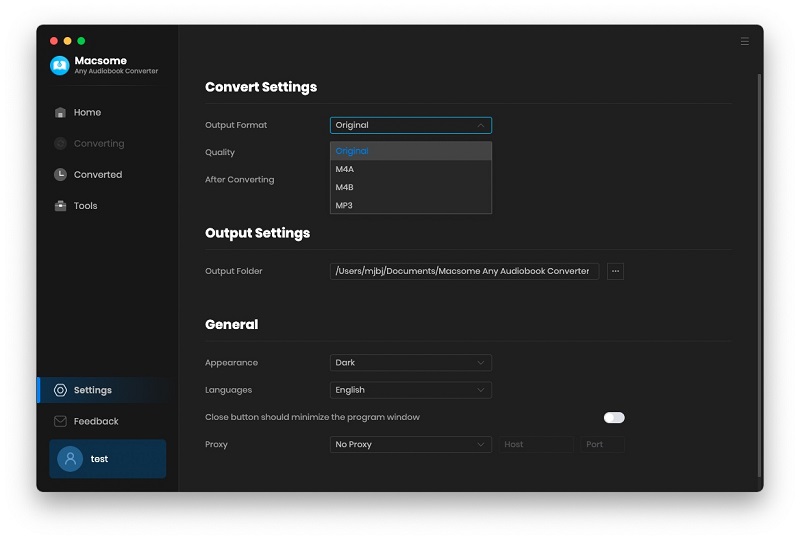
Then you can click the Convert button to start the audiobooks conversion with the default output path.

With the 5X fast than playback speed, you can get the output file easily. After the conversion, the converted audiobooks without DRM protection can be transferred to portable devices.
Removing DRM protection with MasomeAudiobook Converter is one of the most important functions. And Masome Audiobook Converter can keep the chapters of audiobooks. If you want to split the big audiobooks, it also supports splitting audiobooks with 3 methods.
Want to know more about Macsome Audiobook Converter, view:

http://www.macsome.com/audio-book-converter-mac/index.html

Sunday, January 4, 2015

How to burn recorded audio files to CDs

Description: Macsome Audio Recorder can record any audios from Mac, microphone and applications. With Macsome Audio Recorder, You can record audios to MP3, AAC and burn the audios directly to CDs.
Sometimes you’re in the mood for slow love ballads. Other times, you want to listen to some hard rock songs. To meet your different needs quickly, you can burn your favorite music to CDs according to the music styles. With the abundance of audio technology available today, burning your own CDs is a cinch. With Macsome Audio Recorder, you can burn CDs with the recorded music conveniently.
Macsome Audio Recorder can record any audios from applications like iTunes.app, Skype.app, Google Chrome.app, etc. You can record unlimited free music from YouTube, BBC Radio Audio, iTunes Radio and burn the recorded music to CDs. And how to use Macsome Audio Recorder? Now, take iTunes.app for example. Let’s see the detailed steps on how to burn recorded audio files to CDs.
Section 1: Record music from iTunes Radio
Step 1: Add iTunes application
Click the Add Application button to open the Applications window and choose the iTunes.app, and click Open to add it.
Step 2: Load iTunes
Click the  button to load iTunes. If the application has already launched before Macsome Audio Recorder started, the application need to be restarted.
Step 3: Customize the output format
Select iTunes and click the Inspector button. Then select Recording tab in the Setting window.
Click the Output Format drop-down list and select the format For streamingmusic which is appropriate to record iTunes Raido. And the format For streaming music with the fixed value don’t support customizing the parameters. You can also select Custom to customize the output format and parameters.
Step 4: Start the recording
Click the button to start the recording. The app iTunes will show the state Record On unless audio has been detected.
Step 5: Play iTunes Radio
Select iTunes Music library and play the station you want to record on the Radio tab. Then Macsome Audio Recorder will show the iTunes starting to record and show the duration / size info when audio has been detected.
 
In the recording process, you can click the  button to start a new recording for the next music. But when the recording is Record On or paused, it doesn’t work.
Step 6: Finish the recording
Click the button to finish the recording and the state will change from Record On to Record Off. And check the recorded file on Record Bin tab.
Section 2: Burn the recorded music as CDs
Step 1: Select files and click the Burn button. Then burn settings window pops up.
Step 2: Click the Burn Disc In drop-down list to select burning device. And make sure burning device with inserted disc is ready to burn.
Step 3: Click the button to set the burning settings.
Step 4: Click the Burn button to start burning. You can click the Stop button to cancel the burning.
Step 5: When burning process finished, the window close automatically. Then you can enjoy the recorded files in your CDs.
No matter which kind of the music or where the music comes from, as long as you can play them on Mac, you will get the amazing music by recording with Macsome Audio Recorder. Then you can burn the music to CDs. With Macsome Audio Recorder, you can add multiple applications and devices synchronously.
More info about Macsome Audio Recorder, please visit:

Tuesday, December 30, 2014

Play iTunes purchased music songs on MP3 player

All of the iTunes purchased music songs are limited using proprietary software called Digital Restrictions Management. DRM allows Apple to track how many computers the file you downloaded has been decoded, which is why you must authorized your music every time you format your hard drive or change computers.
If you want to play your iTunes purchased music songs on any iPod, iPod Touch, iPhone, Zune, PSP, Creative Zen and other MP3 players, this article gives you a solution. The only and helpful tool is Macsome iTunes Converter. It can legally convert iTunes purchased music song and remove all your DRM protected from them including iTunes music, audiobooks and podcasts to MP3, AAC, or WAV format. In the next guide, it will show you how to convert iTunes music to unprotected MP3 steps by step.

1. Add the iTunes purchased music song. Click the Add button to open the adding window. Then select one purchased music song in the Music Sources list and click the OK button to add.
2. Customize the output format. Click the Macsome iTunes Converter Menu to open the Preferences window and customize the output format in the Advance tab. Click the Output File Format drop-down list to select Custom. Keep the default format MP3 as the output format.
3. Start the converting. Click the Convert button to start converting. And please don't do anything with iTunes during converting, or the conversion may fail when occurring an error.
After the converting finished, the DRM protection will be removed from the iTunes purchased music songs. And you can select the complete file and click the Inspector button to add Artwork.
Actually, no matter what format the audio file is, if it could be played on iTunes, Macsome iTunes Converter will convert it to MP3 or AAC format for you.
So it's also a M4P to MP3 Converter, AA to MP3 Converter. During the converting, Macsome iTunes Converter plays music tracks silently in the background and records audio files with top digital quality at speeds up to 5x. So the conversion process is really fast!
Know more about Macsome iTunes Converter to visit the website http://www.macsome.com/itunes-converter-mac/index.html

How to clip audio, how to crop audio, how to copy audio, how to add effects

Macsome Audio Editor is the audio editing software that offers a variety of audio converting and editing options. You can deal with the special fragment details with cropped fragment, remove the part you do not want, copy / cut / paste the fragment to make audio free combination, and fade in / fade out audio to adjust audio volume. Macsome Audio Editor can make your audio files amazing without the quality loss by using these methods.
After adding the audio, there are several methods to edit video.
Methods 1: Fade in / fade out audio
Select region and click the FadeIn button to make the volume of sound gradually increase from zero.

 Select region and click the FadeOut button to make the volume of sound gradually decrease to zero.

Tips:
1. You can repeat to fade in/ fade out on the same segment.
2. You can also fade in / fade out audio by right-click or the menu Edit.
Methods 2: Crop audio
Select region and click the Crop button, the selected fragment will be added to the program as a new file. You can deal with the special fragment details with cropped fragment. And continue to crop the cropped audio.

Methods 3: Delete / Copy / Cut / Paste the fragment
Select region and Click Delete button to remove the selected part you do not want. Or you can also delete the part audio by right-click or the menu Edit.

Select region and right-click to copy/ cut the fragment, then paste it in the place you want. With the Delete / Copy / Cut / Paste operation, you can follow your ideas to any splice audio content.


If you want to make your audio files amazing, you can use Macsome Audio Editor to repeat the editing methods or use the different editing methods together. In addition, fade in / fade out can always be used at the start / the end. You must use the fade in / fade out before the paste operation. And crop audio file can focus on editing the details. With Macsome Audio Editor and mastering these basic methods, you can make your audio files amazing easily.

Wednesday, December 17, 2014

How to record iTunes radio

Have you ever encountered a wonderful song that needs to pay when listening to the iTunes radio? Or an interesting conversation can’t be downloaded right now?
It’s glad to tell you that Macsome Audio Editor (http://www.macsome.com/audio-recorder-mac/ ) is an useful real-time audio recording utility that can record any sounds from PC devices and applications. It can record iTunes radio totally easily and usefully.
And there are the steps to record iTunes radio.
Step 1: Add iTunes application
Click the Add Application button to open the Applications window and choose the iTunes.app, and click OK to add it.
Step 2: Load iTunes
Click the  
button to load iTunes. If the application has already launched before Macsome Audio Recorder started, the application need to be restarted.
Step 3: Customize the output format
Select iTunes and click the Inspector button. Then select Recording tab in the Setting window. 
Click the Output Format drop-down list and select the format For streaming music which is appropriate to record iTunes Raido. And the format For streaming music with the fixed value don’t support customizing the parameters. You can also select Custom to customize the output format and parameters.
Step 4: Start the recording
Click the 
 button to start the recording. The app iTunes will show the state Record On unless audio has been detected.
Step 5: Play iTunes Radio
Select iTunes Music library and play the station you want to record on the Radio tab. Then Macsome Audio Recorder will show the iTunes starting to record and show the duration / size info when audio has been detected.
In the recording process, you can click the  
button to start a new recording for the next music. But when the recording is Record On or paused, it doesn’t work.
Step 6: Finish the recording
Click the 
 button to finish the recording and the state will change from Record On to Record Off. And check the recorded file on Record Bin tab.
And you can also customize the output tags before or after the recording, preview the output, add outputs to iTunes library and even burn CDs. With Macsome Audio Recorder, you will never miss the impressive music again when you enjoy the iTunes Radio.

How to record audio from Chrome on Mac

Occasionally listening to a wonderful music song when you surf the Internet with Chrome browser, it is more convenient and easier to record audio than register an account to download it. And how to record audio from Chrome?
Here is the answer. Macsome Audio Recorder is designed for Mac users to record audio from app or system alerts, save audio from the Internet, or record voice from microphone on your Mac. It will help you record any type of audio on your Mac. Macsome Audio Recorder can provide good audio quality with the simply steps.
Step 1: Add Google Chrome application
Click the Add Application button to open the Applications window and choose the Google Chrome.app, and click OK to add it.
image
Step 2: Load Google Chrome
Click the  image button to load Google Chrome. If the application has already been launched before Macsome Audio Recorder is started, the application needs to be restarted.
image
Step 3: Customize the output format
Select Google Chrome and click the Inspector button. Then select Recording tab in the Setting window. Click the Output Format drop-down list and select the format For streaming music.
image
Step 4: Start the recording
Click the image button to start the recording. The app Google Chrome will show the state Record On unless audio has been detected.
image
Step 5: Play the music
image
Select and play a music on one website like MTV. Then Macsome Audio Recorder will show the Google Chrome starting to record and show the duration / size info when audio has been detected.
image
Step 6: Get a clip
In the recording process, click the split button image to make a clip and to start a new recording for the next music. 
Or Click the image button to finish the recording. And check the recorded file on Record Bin tab.
image
After recording is done, you can also add artwork for the output file, preview the output, add outputs to iTunes library and even burn CDs.
With Macsome Audio Recorder, you can record whatever you are hearing from the Browser or player on Mac. Macsome Audio Recorder can record audio and split audio automatically. It can remove the mute audio with the silence monitor.
More info about Macsome Audio Recorder, please visit:

How to edit audio from mp4 video